Maglev Trains
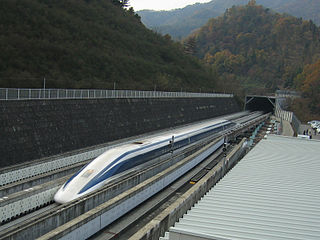
One popular science experiment we are often asked about is the magnetic levitating train. We built a basic version of this experiment to highlight some of the challenges and solutions of a project like this.
What magnets should be used? How much weight will it hold? Why won't the magnet just float by itself?
Repelling magnets
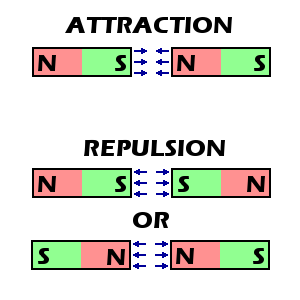
Every magnet has both a north and a south pole. When you place the north pole of one magnet near the south pole of another magnet, they are attracted to one another.
When you place like poles of two magnets near each other (north to north or south to south), they will repel each other. This repelling force is what holds up a levitating train. Unfortunately, harnessing this repelling force is not so simple.
Stability is a problem
A magnet sitting above a magnetic track won't just float in the air by itself. Left unsupported, it will tend to rotate and flip around to attract to the magnets in the track. A mechanical constraint is required to keep it stable.
Read more about stability issues with repelling magnets in our Magnet Basics article.
Can't I just add magnets to make it stable?
No. Earnshaw's theorem says you can't. No matter how many magnets you use, you can't get a floating magnet to be stable with any number of permanent magnets holding it up. Stability must come from some other method, including active feedback, spinning gyroscopes, mechanical stability, pyrolytic graphite, etc.
How strong is the magnet's repelling force?
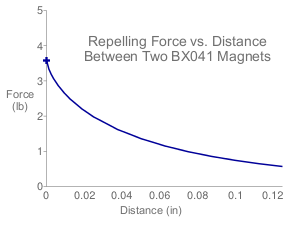
The force depends on the size of the magnets and the distance between them.
Let's consider the magnets used in this train example, the 1" x 1/4" x 1/8" thick BX041 block. Use our Repelling Magnet Calculator to determine the force between two of these magnets arranged with like poles facing each other.
You can find a graph of Pull Force vs. the distance between the magnets either using the calculator, or under the "Technical" tab on the BX041 product page as Pull Force, Case 3. This graph is shown at right.
What does this graph mean? The repelling force depends on the distance between the magnets. When you squeeze two of these magnets together so that they are just touching, one magnet will push the other away with a force of about 3.5 lb. The farther apart the magnets are, the weaker the force. When separated by a gap of about 0.08" (2mm), the force drops to just under 1 lb.
To turn the problem on it's head, the data can give you the opposite answer. For example, if the mass of a train made on one of these magnets is 1 lb, expect the distance between the train magnet and the track to be approximately 0.08". If you add weight to the train, the gap will get smaller.
The actual setup with a bunch of magnets in a row is a bit different than the magnet-to-magnet results presented here and in the calculator. It's a stretch to assume that the results are still valid. Still, it's a good initial estimate.
Track construction
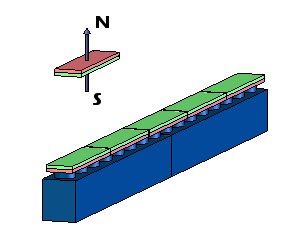
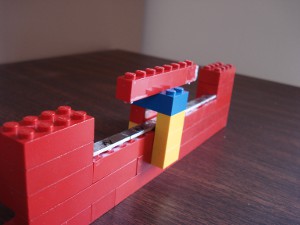
We chose a length of BX041 magnets to create the track. They are strong enough to repel a small train, yet inexpensive enough to build a demonstration length of track on a modest budget. For the building materials, we grabbed an old box of Lego bricks.
When putting down magnets for the track, the same pole on each magnet must face upward. Choose north or south, but they all must be the same. For help identifying the poles, see Which pole is North? We marked all the south poles of our magnets with a marker to make this easier to remember and visualize.
Assembling magnets like this can be difficult. When two magnets are placed side by side with the same pole facing upwards, like poles are pushed next to each other. In this orientation, the magnets repel each other. To get them to line up, they need to be clamped and glued in place, resisting the force that repels them from one another.
We first tried gluing these magnets to long Lego blocks with SuperGlue, but the Lego surface wasn't very good for this. The raised lettering wasn't a good surface. For better results, we sanded the tops of the lego blocks to remove the raised lettering and provide a flat surface.
We also tried E6000 (a popular craft adhesive) and 2-part epoxy. These can also work, but you have to be careful not to make a mess of the sides of the track. As shown at left, the train grabs the sides of the track for stability. Any bumpy glue sticking out the sides of the track will rub against the train, adding unwanted friction. Also, these glues require a much longer dry time. E6000 requires a few hours to set up, while 5-minute epoxy takes 5-10 minutes. SuperGlue can be completely adhered in less than a minute of holding it with your fingers.
Performance and Results
It levitates! How much weight can it hold? The more weight on the train, the smaller the gap between the magnets. All of these examples float well enough to demonstrate the forces involved. Check out the video below to watch a few different trains we constructed with this test track.
The most frustrating result is the friction induced by the stabilizing sides of the train. They rub constantly on the sides of the track, slowing the train down. The attraction of using magnets instead of wheels on a regular train track was to reduce friction, but it appears that some friction is unavoidable.
Commercial maglev trains use electromagnets (and sometimes rare earth magnets) that are controlled with feedback to stabilize the train. Even so, they are not zero-friction systems - they still have to push air out of the way!
Ideas to explore
The construction of the track with Lego pieces was a quick solution, but not perfect. What other type of track construction might be tried? How would curved tracks be constructed?
Would stronger magnets offer more repelling force? Sure. You could build a track with larger BX042 magnets, or even go with something wider like a BX082.
Additional info
Gluing magnets together can be the most frustrating part of building this experiment. The video below shows the best method we came up with using Legos and SuperGlue.


